Categories
Android Apps how to's Security Tutorials

Rooting Your Android Device Using Magisk


Rooting your Android device can unlock a whole range of possibilities allowing you to customize optimize and enhance your device beyond its stock limitations. One popular method of rooting is by using Magisk. Let’s see how it’s done.

Steps

  1. Understanding the Boot Image:

    •   The boot image is an essential part of the Android operating system that contains the kernel and ramdisk.
    • Rooting via Magisk modifies the boot image enabling you to gain root access without altering the system partition.

    2. Prerequisites:

    • Before you begin ensure that your device’s bootloader is unlocked. (If not, search for how to unlock the bootloader of your specific device on google)
    • Backup your data to prevent any potential loss during the rooting process.
    • Charge your device to a sufficient battery level to avoid unexpected shutdowns.

    3. Download Magisk and Required Files:

    •  Obtain the latest version of Magisk Manager APK from the developer’s website.
    • Download the correct boot image for your device’s specific firmware.

    4. Patching the Boot Image:

    • Launch the Magisk Manager app.
    • Tap on the “Install” button and select “Install” from the pop-up menu.
    • Choose “Select and Patch a File” and locate the downloaded boot image.
    • Magisk Manager will patch the boot image creating a patched_boot.img file.

  5. Flashing the Patched Boot Image:

    • Connect your device to your computer using a USB cable.
    • Boot your device into fastboot mode by turning it off then pressing a specific key combination (varies by device).
    • Open a command prompt or terminal window on your computer.
    • Use the fastboot command to flash the patched boot image to your device:

        fastboot flash boot <path_to_patched_boot.img>

   6. Rebooting Your Device:

    • Once the boot image is successfully flashed reboot your device by executing the following command:

        fastboot reboot

  7. Verify Root Access:

    • After your device boots up open the Magisk Manager app.If you see a “Congratulations!” message it means your device is successfully rooted using Magisk.
    • You can also use root-checking applications from the Play Store to verify root access.

  8. Managing Modules and Systemless Modifications:

    • Magisk allows you to install modules which are system modifications that can enhance your rooted device.
    • Open Magisk Manager tap on the “Modules” option and select the desired module to install.
    • Magisk also lets you enable or disable systemless modifications from the app’s settings.

Conclusion

Rooting your Android device using Magisk not only gives you administrative control over your device but also opens up a world of customization possibilities. Remember to exercise caution and backup your data before starting the rooting process.
Categories
Android how to's Software Tutorials

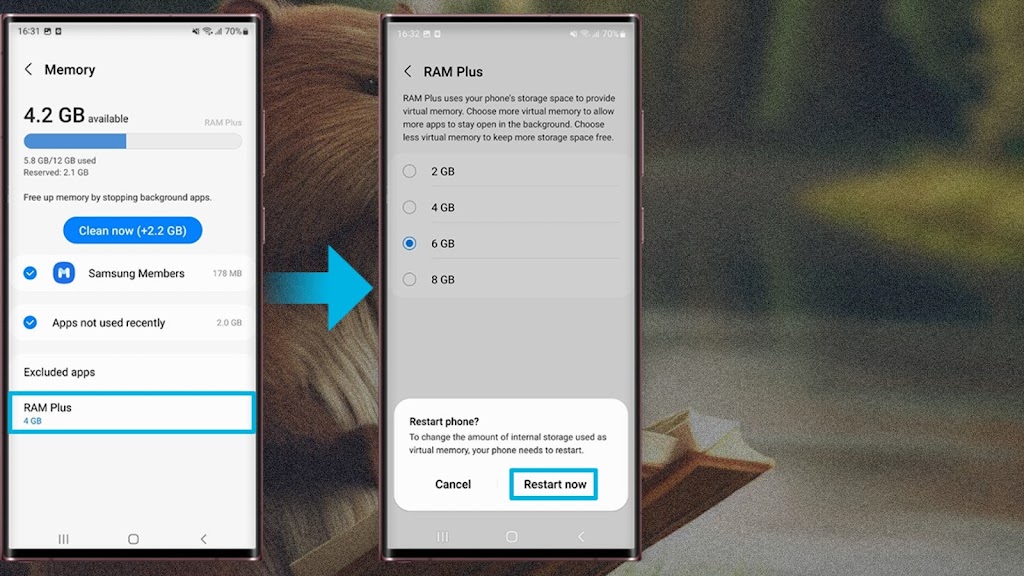
Setting up RAM Plus on your Samsung device


When it comes to maximizing the performance of your Samsung phone one often overlooked feature is RAM+. RAM+ is a feature on Samsung phones that allows you to allocate a portion of your device’s storage as virtual RAM effectively increasing your phone’s available random-access memory (RAM).

Step 1: Check Device Compatibility

Before proceeding with the setup verify that your Samsung phone supports the RAM+ feature. Not all Samsung models have this feature and it may vary depending on the phone’s hardware specifications. To check if your device supports RAM Plus:
  1. Go to the Settings menu on your Samsung phone.
  2. Scroll down and tap on “About Phone” or “About Device.”
  3. Look for the “Model number” or “Device Model.” Note down this information.
Now perform a quick internet search using your device model number and the keyword “RAM+ compatibility.” You should be able to find reliable sources confirming whether or not your Samsung phone supports the feature.

Step 2: Update Your Phone’s Software

Ensure that your Samsung phone is up to date with the latest software version. Manufacturers often release updates that include bug fixes and feature enhancements which may include improvements to the RAM Plus feature. To check for updates:
  1. Open the Settings menu on your Samsung phone.
  2. Scroll down and tap on “Software update” or “System update.”
  3. Tap on “Download and install” if an update is available.
Follow the on-screen instructions to complete the update process. It is recommended to have a stable internet connection and sufficient battery charge before initiating the update.

Step 3: Enable RAM Plus on Your Samsung Phone

Once you have confirmed device compatibility and updated your phone’s software proceed with enabling the RAM+ feature:
  1. Open the Settings menu on your Samsung phone.
  2. Scroll down and tap on “Device care” or “Device maintenance.”
  3. Within the device care settings select “Memory” or “Memory management.”
  4. Look for the RAM  + option and tap on it.
  5. Enable RAM+ by toggling the switch or following the prompts.
It is worth noting that enabling RAM+ will allocate a portion of your device’s storage space as virtual RAM which means less storage capacity will be available for other data on your phone. Ensure that you have sufficient space available before enabling this feature.

Step 4: Optimize and Monitor RAM+ Usage

Now that RAM+ is enabled on your Samsung phone it is essential to optimize its usage for maximum performance:
  1. Within the RAM Plus settings you may find different RAM+ modes. These modes control how your phone utilizes the allocated virtual RAM. Experiment with different modes to find the one that suits your usage pattern best.
  2. From time to time check the RAM+ settings to monitor the usage and ensure that it is being efficiently utilized.
  3. If you encounter any performance issues after enabling RAM such as reduced storage availability or decreased battery life consider adjusting the RAM+ settings or disabling the feature temporarily.
Need to use your hard drive as RAM on windows, check out this article from Tech Tutorials Hub
Categories
Android Apps how to's Tutorials Zimbabwe

Guide to Setting Up RCS Chats on Google Messages for your Econet SIM card

Rich Communication Services (RCS) is a next-generation messaging protocol that brings enhanced features and functionality to your messaging app and Econet now has it. Google Messages the default messaging app on Android devices supports RCS and allows you to have a more interactive messaging experience. In this article I am going to you through the process of setting up RCS chats on Google Messages.

Step 1: Check for RCS Support

Before proceeding ensure that your mobile carrier and device are compatible with RCS. Google Messages currently supports RCS in partnership with many carriers worldwide. To check if your device is compatible open the Google Messages app and look for the “RCS chats” option in the settings menu. If you don’t see it it may indicate that your device or carrier does not yet support RCS.

Step 2: Update Google Messages

To make sure you have the latest version of Google Messages go to the Google Play Store on your Android device and search for “Google Messages.” If an update is available click on the “Update” button. Keeping your app up to date ensures you have access to the latest features and improvements.

Step 3: Enable RCS chats

Once you have confirmed RCS support and updated Google Messages open the app and follow these steps to enable Chat Features:

  1. Open the Google Messages app on your Android device.
  2. Tap on your profile picture icon located in the top right corner of the screen.
  3. Select “Messaging Settings” from the drop-down menu.
  4. In the settings menu tap on “RCS chats.”
  5. If you see the “Enable RCS chats” option tap on it and wait for the process to complete.


Note: It may take a few minutes to activate RCS.

Step 4: Verify Phone Number

Once RCS is enabled you will need to verify your phone number before you can start using RCS features. To verify your phone number:

  1. In the RCS chats section, tap on “Verify Phone Number.”
  2. Follow the on-screen instructions to verify your phone number if it isn’t verified automatically.

Step 5: Explore RCS Features

After completing the verification process you can now enjoy the enhanced capabilities of RCS in Google Messages. RCS includes features like read receipts typing indicators high-quality media sharing and more. You can take advantage of these features when communicating with other RCS-enabled devices and users. Below is an example of an RCS chat:

Step 6: Spread the Word

Once you have successfully set up RCS chats on Google Messages don’t forget to spread the word to your friends and family. Encourage them to enable RCS on their devices and start enjoying the enhanced messaging experience together (you can even send them this post ;). RCS chats work seamlessly with contacts using RCS-supported apps on Android devices. 

Conclusion

Setting up RCS chats on Google Messages offers a more interactive and engaging messaging experience. By following the steps outlined in this guide you can enable RCS and access its enhanced features. Make sure to check for RCS support update your Google Messages app enable chat features verify your phone number and explore the various RCS functionalities available. Enjoy a richer messaging experience with RCS on Google Messages!

Categories
Chrome Tutorials Websites

Using automatic dark mode for every website – Chrome

Once again another Chrome experimental feature which I think everybody is gonna love. According to different surveys and studies, it has been concluded that most people prefer using dark themes compare to light themes. Personally I’m also a true fan of dark themes. Dark themes come with many pros compared to light themes. Many websites now have a ‘switch to dark mode option’ but some don’t. We’re going to discuss on how to enable ‘auto dark mode for every website’. This option works on every site regardless if it supports dark mode or not.

What to do: Step 1

Firstly go to chrome://flags

NB:This only works with Google Chrome

Step 2

Copy the following text ‘Darken websites checkbox in themes setting’ and paste it in the search box and click enter

Step 3

Click enable and your browser will automatically restart and you’re done.

Categories
Dark Web The Internet Tutorials

Accessing the dark web – Guide


The dark web is the World Wide Web content that exists on darknets: overlay networks that use the Internet but require specific software, configurations, or authorization to access.

Wikipedia

The dark web contains a lot of content that doesn’t exist on the normal world wide web sites. These sites only use the .onion domain and no other world wide web domain is available on the darkweb. Examples of such content are:

  • File uploads and transfers
  • Whistleblowing websites
  • Dark web versions of popular websites
  • Black markets
  • Email services

How to access the darkweb

To access the darkweb you need an anonymity browser called Tor browser.

What is Tor?

Tor is free and open-source software for enabling anonymous communication. It directs Internet traffic through a free, worldwide, volunteer overlay network, consisting of more than seven thousand relays, to conceal a user’s location and usage from anyone performing network surveillance or traffic analysis.

Wikipedia

Tor browser

The Tor Browser is a web broswer that anonymizes your web traffic using the Tor network, making it easy to protect your identity online.

If you’re investigating a competitor, researching an opposing litigant in a legal dispute, or just think it’s creepy for your ISP or the government to know what websites you visit, then the Tor Browser might be the right solution for you.

Tor browser is the only browser that can be used to access the darkweb since it’s one of the most secure browsers and it’s the only one that can open .onion domains. Tor is available on most popular operating systems and you can download any version of the browser on their website and also for mobile users you can find Tor Browser on the Google Play Store on Android and the App Store on iOS. Now that you have downloaded the Tor browser, follow these simple steps and you’ll be in the darkweb in no time:

  • Connect to any VPN for anonymity
  • Create a darkweb email. You can create an email for the darkweb with any of the following websites and note that these websites can only be viewed with the Tor Browser.
    • sigaintevyh2rzvw.onion
    • lelantoss7bcnwbv.onion
    • ncikv3i4qfzwy2qy.onion
    • protonirockerxow.onion
    • mail2tor2zyjdctd.onion
  • Go to any of the darkweb search engines listed below:
    • hss3uro2hsxfogfq.onion
    • msydqstlz2kzerdg.onion
    • reconponydonugup.onion
    • cnkj6nippubgycuj.onion
    • 3g2upl4pq6kufc4m.onion
  • And you’re done!

Note that you can find all sorts of content on the darkweb including illegal content for example stolen credit cards, stolen cryptocurrency wallets and also child p*rn so be careful on the darkweb