Categories
Android Chrome Software

Useful Chrome Flags for Android and How to Enable Them


Chrome flags are experimental features in the Chrome browser that allow users to customize and enhance their browsing experience. With a plethora of flags available Android users can unlock exciting features and improve their productivity. In this article I will explore some useful Chrome flags for Android and guide you on how to enable them.

Enabling the flags

The process is simple. To enable a Chrome flag, all you need to do is to go to chrome://flags then search the name of the flag and change from default to enabled. 

Incognito Screenshot

By enabling this flag you can capture screenshots while browsing in incognito mode. It’s a handy feature for quickly saving or sharing important information from private browsing sessions. To enable it, go to chrome://flags and search ‘Incognito screenshot’

Device Reauthentication for Incognito

With this flag enabled Chrome will request a device authentication (fingerprint PIN or biometric) every time you open an incognito tab. This adds an extra layer of privacy and prevents unauthorized access to your incognito browsing data. To enable it, go to chrome://flags and search for ‘Device reauth’

Biometric Reauth for Password Filling

Enabling this flag enhances the security of autofilling passwords. It ensures that biometric authentication is required for Chrome to fill in saved passwords providing an additional layer of protection against unauthorized access. To enable it, go to chrome://flags and search ‘biometric’

Web Feed

By enabling this flag you gain access to a personalized feed of articles and content based on your interests. It offers a convenient way to discover new information and stay updated on topics that matter to you. To enable it, go to chrome://flags and search for ‘web feed’

Parallel Downloading

Enabling this flag enables Chrome to split large file downloads into smaller chunks allowing for faster and more efficient downloads. It’s particularly beneficial for those who frequently download large files on their Android devices. To enable it, go to chrome://flags and search for ‘parallel’

Start Surface

This flag introduces a revamped start page in Chrome providing a more organized and visually appealing way to access your most visited websites bookmarks and recent search history. To enable it, go to chrome://flags and search for ‘start surface’

Dark Mode for Webpages

By enabling this flag Chrome can automatically convert web pages to dark mode providing a more comfortable browsing experience in low-light conditions and reducing eye strain. To enable it, go to chrome://flags and search for ‘dark mode’

Enable Smooth Scrolling

Enabling this flag enhances the scrolling experience in Chrome making it smoother and more fluid. It can be particularly beneficial on devices with high refresh rate displays. To enable it, go to chrome://flags and search ‘smooth scrolling’

Chrome flags provide Android users with the ability to tailor their browsing experience and unlock exciting features. By enabling these flags you can enhance productivity privacy and overall browsing enjoyment.
Categories
how to's Software Tutorials Windows

How to Install Tiny 11

My last article was a comparison of Tiny 11 and Windows 11 operating systems a d today we’re going to look at how you can install tiny 11 on your computer. Tiny 11 is a lightweight and efficient operating system designed for low-spec hardware making it ideal for older computers or devices with limited resources. In this blog post we will provide a step-by-step guide on how to install Tiny 11 using bootable media. Follow along to unleash the full potential of your hardware with this lightweight operating system.

Requirements

Before we jump into the installation process make sure you have the following:

1. A USB flash drive (at least 4GB) or a blank DVD.

2. An ISO file of Tiny 11 downloaded from the official website.

3. A computer or device on which you want to install Tiny 11.

Step 1: Create a Bootable Media

To install Tiny 11 you’ll need to create a bootable USB or DVD. Here’s how:

  1. Insert your USB flash drive or blank DVD into your computer.
  2. Open a reliable ISO burning tool like Rufus (for USB) or ImgBurn (for DVD). 
  3. Select the ISO file of Tiny 11 you downloaded earlier. 
  4. Choose your USB flash drive or DVD as the destination.
  5. Verify the settings and click on “Start” to begin creating the bootable media.
  6. Wait until the process completes and ensure that the bootable media is created successfully.

Step 2: Configure BIOS or Boot Menu

Once you have your bootable media ready you’ll need to configure your computer’s BIOS or Boot Menu to prioritize booting from the USB or DVD. Here’s how:

  1. Restart your computer and enter BIOS settings by pressing the appropriate key (usually F2 or F10 or F8) during the startup process. The key varies depending on the manufacturer.
  2. Once inside the BIOS navigate to the Boot or Boot Options section.
  3. Set the boot priority order to give precedence to the USB or DVD drive.
  4. Save the changes and exit the BIOS.

Note: If you’re using a Boot Menu instead of BIOS simply press the key for accessing the Boot Menu (usually F12 or Esc) during startup and select the USB or DVD drive as the boot device.

Step 3: Installing Tiny 11

With your system set up to boot from the USB or DVD drive you’re ready to proceed with the installation process.

  1. Insert the bootable media into your computer and restart it.
  2. The Tiny 11 installation process will begin automatically. Follow the on-screen instructions to proceed.
  3. Select your language time zone and other preferences when prompted.
  4. Choose the installation type. You can opt for a fresh installation or if you have an older version of Tiny 11 choose the upgrade option if available.
  5. Select the destination drive where you want to install Tiny 11. Make sure to back up any important data on that drive beforehand.
  6. Customize the installation by selecting optional components or additional software if desired.
  7. Review your selections and begin the installation process.
  8. Wait until the installation completes. This may take some time depending on your system’s specifications.
  9. Once the installation finishes you will be prompted to restart your computer. Remove the bootable media and press Enter to reboot.

Congratulations! You have successfully installed Tiny 11 on your computer. You can now enjoy a sleek and lightweight operating system with a minimal resource footprint.

Categories
Security Software Windows

Tiny 11 vs. Windows 11: My two cents


Operating systems play a crucial role in our digital lives by providing a platform to interact with our devices. The release of Windows 11 generated a wave of excitement and anticipation among users. In this post we I compare Windows 11 the latest iteration of the Windows OS with Tiny 11 an alternative operating system that offers a lightweight approach.

Compatibility and System Requirements

Windows 11 requires specific hardware requirements including a 64-bit CPU at least 4GB of RAM and 64GB of storage among other specifications. These requirements might pose a challenge for older devices. In contrast Tiny 11 is designed to run on resource-constrained systems making it an attractive option for older hardware and low-end devices.

Features and Customization

Windows 11 introduces new features such as Snap Layouts, Snap Groups and Microsoft Teams integration. It focuses on productivity with enhancements to multitasking gaming and entertainment experiences. In terms of customization users have more control over personalizing their desktops including new themes wallpapers and widgets.

While Tiny 11 may lack certain advanced features found in Windows 11 its core strength lies in its lightweight and fast performance. It is optimized to run smoothly on low-powered machines providing a stripped-down interface that minimizes distractions and maximizes efficiency.

App Ecosystem and Development

Windows 11 benefits from a vast application ecosystem. It supports a wide range of software and games with compatibility for both traditional Win32 applications and modern Universal Windows Platform (UWP) apps. This vast app library makes it easier to find and use applications tailored to specific needs.

Tiny 11 although not as extensive focuses on simplicity and essential applications. It includes a selection of lightweight apps that cover essential functions such as web browsing office productivity media playback and file management. While the app ecosystem for Tiny 11 may be limited it offers a hassle-free experience without the bloat associated with larger operating systems.

Privacy and Security

Both Windows 11 and Tiny 11 prioritize privacy and security but they adopt different approaches. Windows 11 comes with enhanced security features such as TPM 2.0 Secure Boot and Microsoft Defender Antivirus. Tiny 11 while not offering the same level of native security features benefits from its lightweight nature making it less susceptible to malware and cyber threats due to its reduced attack surface.

Conclusion

Choosing between Tiny 11 and Windows 11 depends on users’ requirements and preferences. Windows 11 offers a visually appealing and feature-rich operating system suitable for modern hardware with a robust application ecosystem. On the other hand Tiny 11 targets users seeking a lightweight and fast experience on low-powered devices or those looking to simplify their computing environment. Ultimately the choice between these operating systems comes down to individual priorities – whether it’s performance feature set customization options or device compatibility. By thoroughly evaluating these factors and considering your specific needs you can make an informed decision that aligns with your preferences.

Categories
Android how to's Software Tutorials

Setting up RAM Plus on your Samsung device


When it comes to maximizing the performance of your Samsung phone one often overlooked feature is RAM+. RAM+ is a feature on Samsung phones that allows you to allocate a portion of your device’s storage as virtual RAM effectively increasing your phone’s available random-access memory (RAM).

Step 1: Check Device Compatibility

Before proceeding with the setup verify that your Samsung phone supports the RAM+ feature. Not all Samsung models have this feature and it may vary depending on the phone’s hardware specifications. To check if your device supports RAM Plus:
  1. Go to the Settings menu on your Samsung phone.
  2. Scroll down and tap on “About Phone” or “About Device.”
  3. Look for the “Model number” or “Device Model.” Note down this information.
Now perform a quick internet search using your device model number and the keyword “RAM+ compatibility.” You should be able to find reliable sources confirming whether or not your Samsung phone supports the feature.

Step 2: Update Your Phone’s Software

Ensure that your Samsung phone is up to date with the latest software version. Manufacturers often release updates that include bug fixes and feature enhancements which may include improvements to the RAM Plus feature. To check for updates:
  1. Open the Settings menu on your Samsung phone.
  2. Scroll down and tap on “Software update” or “System update.”
  3. Tap on “Download and install” if an update is available.
Follow the on-screen instructions to complete the update process. It is recommended to have a stable internet connection and sufficient battery charge before initiating the update.

Step 3: Enable RAM Plus on Your Samsung Phone

Once you have confirmed device compatibility and updated your phone’s software proceed with enabling the RAM+ feature:
  1. Open the Settings menu on your Samsung phone.
  2. Scroll down and tap on “Device care” or “Device maintenance.”
  3. Within the device care settings select “Memory” or “Memory management.”
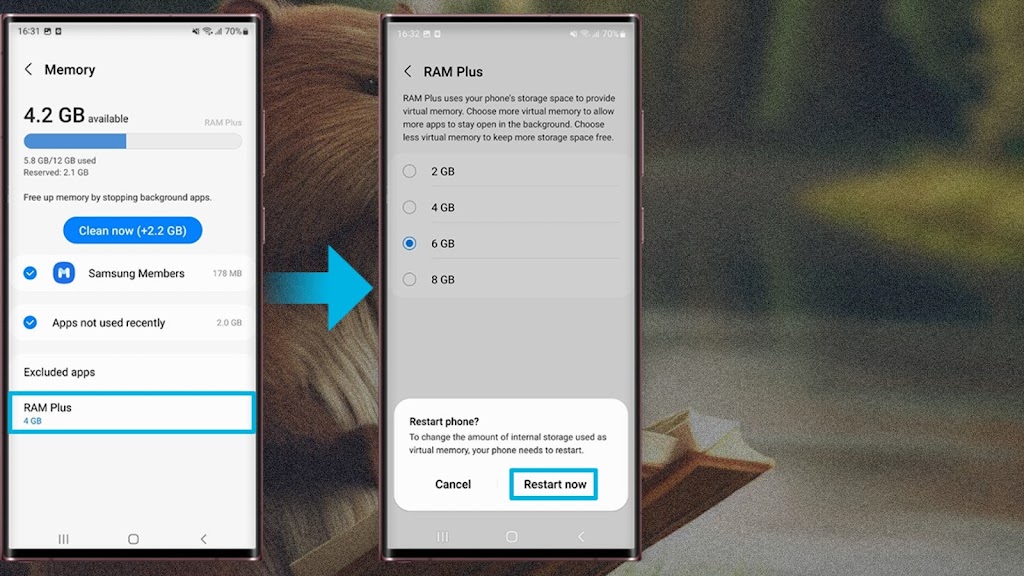
  4. Look for the RAM  + option and tap on it.
  5. Enable RAM+ by toggling the switch or following the prompts.
It is worth noting that enabling RAM+ will allocate a portion of your device’s storage space as virtual RAM which means less storage capacity will be available for other data on your phone. Ensure that you have sufficient space available before enabling this feature.

Step 4: Optimize and Monitor RAM+ Usage

Now that RAM+ is enabled on your Samsung phone it is essential to optimize its usage for maximum performance:
  1. Within the RAM Plus settings you may find different RAM+ modes. These modes control how your phone utilizes the allocated virtual RAM. Experiment with different modes to find the one that suits your usage pattern best.
  2. From time to time check the RAM+ settings to monitor the usage and ensure that it is being efficiently utilized.
  3. If you encounter any performance issues after enabling RAM such as reduced storage availability or decreased battery life consider adjusting the RAM+ settings or disabling the feature temporarily.
Need to use your hard drive as RAM on windows, check out this article from Tech Tutorials Hub