Categories
Android how to's Tutorials

How to Root an Android Device without using Magisk


Rooting an Android device enables users to gain full administrative control giving them the ability to customize their device access advanced system settings and install applications that require root access. While Magisk is one popular method to achieve root access there are alternative approaches available. In this article we will explore an alternative method to root an Android device without using Magisk.

Important Considerations

Before proceeding with any root method it’s important to note that rooting your device voids the manufacturer’s warranty and may also expose your device to potential security risks. It is recommended to backup your data and proceed at your own risk. Additionally the steps provided in this article may vary depending on your specific device model and Android version.

Method: Using SuperSU

SuperSU is a popular root management app that can be used as an alternative to Magisk. Here’s how you can use SuperSU to root your Android device:

Step 1: Prepare Your Device

Firstly ensure that your device is charged sufficiently and that USB debugging is enabled. To enable USB debugging go to “Settings” > “Developer options” and toggle on “USB debugging”.

Step 2: Download Required Files

Download the SuperSU ZIP file from a trusted source. You can find it on the official XDA Developers forum or on the official SuperSU website. Additionally you will need to download the appropriate version of TWRP (Team Win Recovery Project) custom recovery for your specific device model.

Step 3: Boot into Recovery Mode

Power off your device and then simultaneously press and hold the volume up and power buttons to boot into recovery mode. Use the volume keys to navigate and the power button to select.

Step 4: Install TWRP Custom Recovery

In recovery mode select “Install” and navigate to the location where you saved the TWRP image file. Tap on it to install it. Once installed reboot your device back into recovery mode.

Step 5: Flash SuperSU ZIP File

In TWRP recovery select “Install” and navigate to the location where you saved the SuperSU ZIP file. Tap on it to install it. Swipe to confirm the flash process.

Step 6: Reboot Your Device

After the flashing is complete select “Reboot System” to restart your device.

Step 7: Verify Root Access

After your device restarts you can check if the rooting was successful. Download and install a root-checking app from the Google Play Store such as Root Checker and run it. If the app confirms root access your device has been successfully rooted.

Conclusion

Rooting an Android device without using Magisk is possible by using alternative methods such as SuperSU. However it is crucial to keep in mind that rooting a device comes with risks and may void your warranty. Ensure you understand the procedure and risks involved before proceeding. Always research and follow the specific instructions for your device model and Android version.
Categories
how to's Tutorials Windows

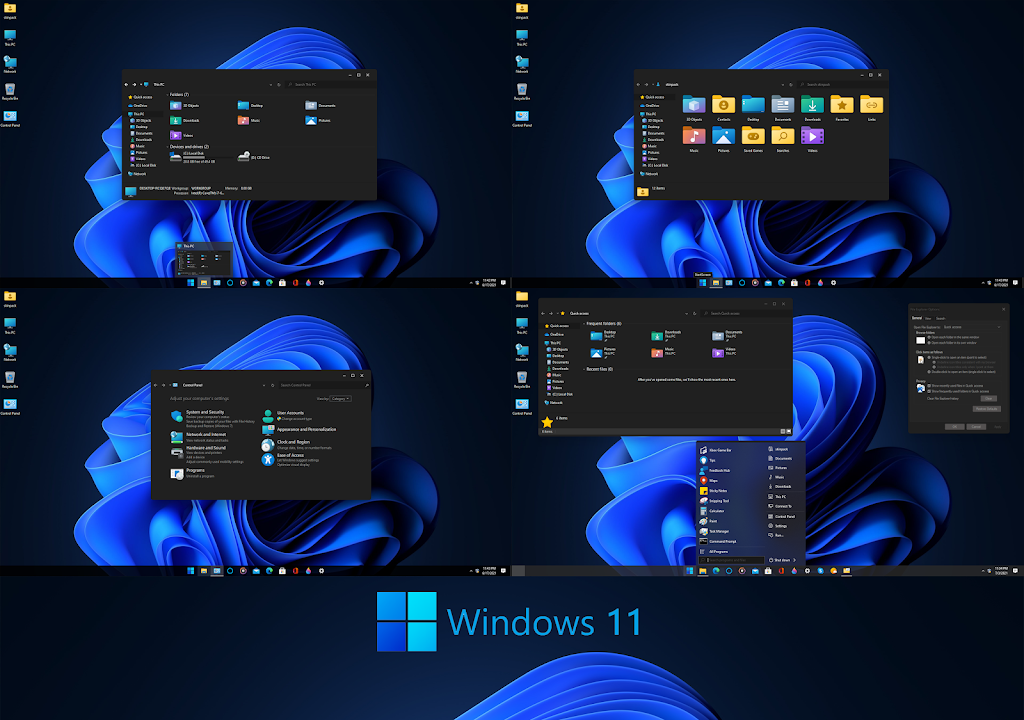
Transform Your Desktop: How to Easily Change and Customize Icon Packs on Windows

Windows operating systems have long offered users the ability to customize their desktop experience. While changing desktop backgrounds and themes is relatively well-known many people may be unfamiliar with the process of changing the icon pack. This article will guide you through the steps of using Ultra UX Theme Patcher to modify your desktop icon pack on Windows.

Step 1: Download and Install Ultra UX Theme Patcher

To start go to the official Ultra UX Theme Patcher website and download the latest version of the program. Be sure to choose the correct version for your Windows operating system (32-bit or 64-bit). Once downloaded run the installer and follow the on-screen instructions to complete the installation process. It is important to note that modifying system files can have risks so proceed with caution and create a system restore point as a precaution.

Step 2: Choose an Icon Pack

After successfully installing Ultra UX Theme Patcher you will need to find an icon pack that suits your preferences. Several websites offer a wide range of icon packs to choose from such as DeviantArt, IconArchive and WinCustomize. Browse through these websites and download an icon pack of your liking. Make sure the icon pack you choose is compatible with your version of Windows.

Step 3: Extract the Icon Pack

Once you have downloaded an icon pack navigate to the location where the file is saved and extract its contents using a file extracting tool like WinRAR or 7-Zip. Right-click on the file and select “Extract Here” to unpack the contents into a folder.

Step 4: Apply the Icon Pack

Locate the folder where the icon pack was extracted and check if there is an .ICO or .DLL file present. Right-click on the Ultra UX Theme Patcher shortcut on your desktop and select “Run as administrator” to launch the program. A new window will open displaying the status of system files in your Windows installation.

Click on the “Files Patched” tab and enable the checkbox for the option “Set Windows Live mail to the default”. Then click on the “Extra” tab and enable the option “Use a custom 3rd party theme”. Ensure that the checkboxes for “Theme Signature Bypass” and “UxStyle Core” are also enabled. Click on the “Patch” button and wait for the process to complete.

Step 5: Copy Icon Files

After patching is complete navigate to the folder where the icon pack was extracted. Copy the .ICO or .DLL files from the icon pack folder and go to the following directory on your Windows installation drive (usually C:WindowsSystem32).

Inside the System32 folder locate the “imageres.dll” file and make a backup copy of it. Replace the original “imageres.dll” file with the one you copied from the icon pack folder. It is essential to have administrative privileges to overwrite system files.

Step 6: Apply the Changes and Restart

Once you have replaced the “imageres.dll” file save all your work and restart your computer. After the restart you should see the new icon pack applied to your desktop file explorer and system icons.

Conclusion

Changing the desktop icon pack can be a fun and satisfying way to personalize your Windows desktop. By using Ultra UX Theme Patcher you can easily modify your desktop’s appearance with custom icon packs. Remember to exercise caution during the process and be sure to back up any essential files before making any changes. Enjoy exploring the vast array of icon packs available and transforming the look and feel of your Windows desktop.

Categories
Entertainment how to's Tutorials Websites

Unlock the Melodies: Ways to Download Music Hassle-Free


Source: Getty Images

In today’s digital era music is easily accessible and can be enjoyed in various ways. Thanks to the advancements in technology downloading music has become even simpler and more convenient. Gone are the days of purchasing physical CDs or vinyl records(it’s a bit inappropriate to mention them though). Now you can easily download and listen to your favorite songs with just a few clicks. In this article I will talk about various ways to download music and provide step-by-step instructions to help you get started.

Streaming Platforms and Offline Listening

One of the most popular ways to download music is through streaming platforms. Platforms like Spotify, Apple Music and Amazon Music offer extensive catalogs of songs that you can stream online. However they also provide the option to download songs and albums for offline listening allowing you to enjoy your favorite tracks even without an internet connection. To download music from these platforms follow these steps:

  • Install the respective streaming platform’s app on your device.
  • Sign up or log in to your account.
  • Search for the desired song or album.
  • Look for the download icon (usually represented by an arrow pointing downward and select it.
  • The song or album will be downloaded to your device and will be available for offline listening.

Digital Music Stores

Another way to download music is through digital music stores such as iTunes, Amazon Music Store or Google Play Music. These platforms offer a vast collection of songs and albums that you can purchase and download. To download music from digital music stores follow these steps:

  • Download and install the music store’s application on your device.
  • Sign up or log in to your account.
  • Browse or search for the desired song or album.
  • Click on the “Download” button next to the selected song or album.
  • Follow the instructions to complete the purchase and download the music to your device.

Free Music Download Websites

This method is probably the most popular method to download music in Zimbabwe. There are several websites that allow you to download music for free legally. However it’s crucial to ensure that you download music from legitimate sources to respect copyright laws. Here are steps to download music from free music download websites:

  • Identify a trusted and reliable free music download website such as SoundCloud, Jamendo or Bandcamp.
  • Go to the website and search for the desired song or artist.
  • Click on the download button or follow the provided instructions to download the song to your device.

YouTube Downloaders

YouTube is home to millions of music videos covers and remixes. While officially downloading music from YouTube is not supported due to copyright restrictions there are third-party applications and websites known as YouTube downloaders that allow you to save your favorite tracks. Here’s how to use a YouTube downloader:

  • Copy the URL of the YouTube video you want to download.
  • Visit a trusted YouTube downloader website such as Y2Mate ClipGrab or 4K Video Downloader.
  • Paste the YouTube video URL into the downloader’s search bar. 
  • Choose your desired output format (usually MP3 or MP4) and select the quality. 
  • Click on the “Download” button and the song will be saved to your device.

Remember to use these methods responsibly and respect copyright laws by downloading music legally and supporting your favorite artists whenever possible. Enjoy your favorite tunes wherever you go.
Categories
how to's Software Tutorials Windows

How to Install Tiny 11

My last article was a comparison of Tiny 11 and Windows 11 operating systems a d today we’re going to look at how you can install tiny 11 on your computer. Tiny 11 is a lightweight and efficient operating system designed for low-spec hardware making it ideal for older computers or devices with limited resources. In this blog post we will provide a step-by-step guide on how to install Tiny 11 using bootable media. Follow along to unleash the full potential of your hardware with this lightweight operating system.

Requirements

Before we jump into the installation process make sure you have the following:

1. A USB flash drive (at least 4GB) or a blank DVD.

2. An ISO file of Tiny 11 downloaded from the official website.

3. A computer or device on which you want to install Tiny 11.

Step 1: Create a Bootable Media

To install Tiny 11 you’ll need to create a bootable USB or DVD. Here’s how:

  1. Insert your USB flash drive or blank DVD into your computer.
  2. Open a reliable ISO burning tool like Rufus (for USB) or ImgBurn (for DVD). 
  3. Select the ISO file of Tiny 11 you downloaded earlier. 
  4. Choose your USB flash drive or DVD as the destination.
  5. Verify the settings and click on “Start” to begin creating the bootable media.
  6. Wait until the process completes and ensure that the bootable media is created successfully.

Step 2: Configure BIOS or Boot Menu

Once you have your bootable media ready you’ll need to configure your computer’s BIOS or Boot Menu to prioritize booting from the USB or DVD. Here’s how:

  1. Restart your computer and enter BIOS settings by pressing the appropriate key (usually F2 or F10 or F8) during the startup process. The key varies depending on the manufacturer.
  2. Once inside the BIOS navigate to the Boot or Boot Options section.
  3. Set the boot priority order to give precedence to the USB or DVD drive.
  4. Save the changes and exit the BIOS.

Note: If you’re using a Boot Menu instead of BIOS simply press the key for accessing the Boot Menu (usually F12 or Esc) during startup and select the USB or DVD drive as the boot device.

Step 3: Installing Tiny 11

With your system set up to boot from the USB or DVD drive you’re ready to proceed with the installation process.

  1. Insert the bootable media into your computer and restart it.
  2. The Tiny 11 installation process will begin automatically. Follow the on-screen instructions to proceed.
  3. Select your language time zone and other preferences when prompted.
  4. Choose the installation type. You can opt for a fresh installation or if you have an older version of Tiny 11 choose the upgrade option if available.
  5. Select the destination drive where you want to install Tiny 11. Make sure to back up any important data on that drive beforehand.
  6. Customize the installation by selecting optional components or additional software if desired.
  7. Review your selections and begin the installation process.
  8. Wait until the installation completes. This may take some time depending on your system’s specifications.
  9. Once the installation finishes you will be prompted to restart your computer. Remove the bootable media and press Enter to reboot.

Congratulations! You have successfully installed Tiny 11 on your computer. You can now enjoy a sleek and lightweight operating system with a minimal resource footprint.

Categories
Android Apps how to's Security Tutorials

Rooting Your Android Device Using Magisk


Rooting your Android device can unlock a whole range of possibilities allowing you to customize optimize and enhance your device beyond its stock limitations. One popular method of rooting is by using Magisk. Let’s see how it’s done.

Steps

  1. Understanding the Boot Image:

    •   The boot image is an essential part of the Android operating system that contains the kernel and ramdisk.
    • Rooting via Magisk modifies the boot image enabling you to gain root access without altering the system partition.

    2. Prerequisites:

    • Before you begin ensure that your device’s bootloader is unlocked. (If not, search for how to unlock the bootloader of your specific device on google)
    • Backup your data to prevent any potential loss during the rooting process.
    • Charge your device to a sufficient battery level to avoid unexpected shutdowns.

    3. Download Magisk and Required Files:

    •  Obtain the latest version of Magisk Manager APK from the developer’s website.
    • Download the correct boot image for your device’s specific firmware.

    4. Patching the Boot Image:

    • Launch the Magisk Manager app.
    • Tap on the “Install” button and select “Install” from the pop-up menu.
    • Choose “Select and Patch a File” and locate the downloaded boot image.
    • Magisk Manager will patch the boot image creating a patched_boot.img file.

  5. Flashing the Patched Boot Image:

    • Connect your device to your computer using a USB cable.
    • Boot your device into fastboot mode by turning it off then pressing a specific key combination (varies by device).
    • Open a command prompt or terminal window on your computer.
    • Use the fastboot command to flash the patched boot image to your device:

        fastboot flash boot <path_to_patched_boot.img>

   6. Rebooting Your Device:

    • Once the boot image is successfully flashed reboot your device by executing the following command:

        fastboot reboot

  7. Verify Root Access:

    • After your device boots up open the Magisk Manager app.If you see a “Congratulations!” message it means your device is successfully rooted using Magisk.
    • You can also use root-checking applications from the Play Store to verify root access.

  8. Managing Modules and Systemless Modifications:

    • Magisk allows you to install modules which are system modifications that can enhance your rooted device.
    • Open Magisk Manager tap on the “Modules” option and select the desired module to install.
    • Magisk also lets you enable or disable systemless modifications from the app’s settings.

Conclusion

Rooting your Android device using Magisk not only gives you administrative control over your device but also opens up a world of customization possibilities. Remember to exercise caution and backup your data before starting the rooting process.
Categories
Android how to's Software Tutorials

Setting up RAM Plus on your Samsung device


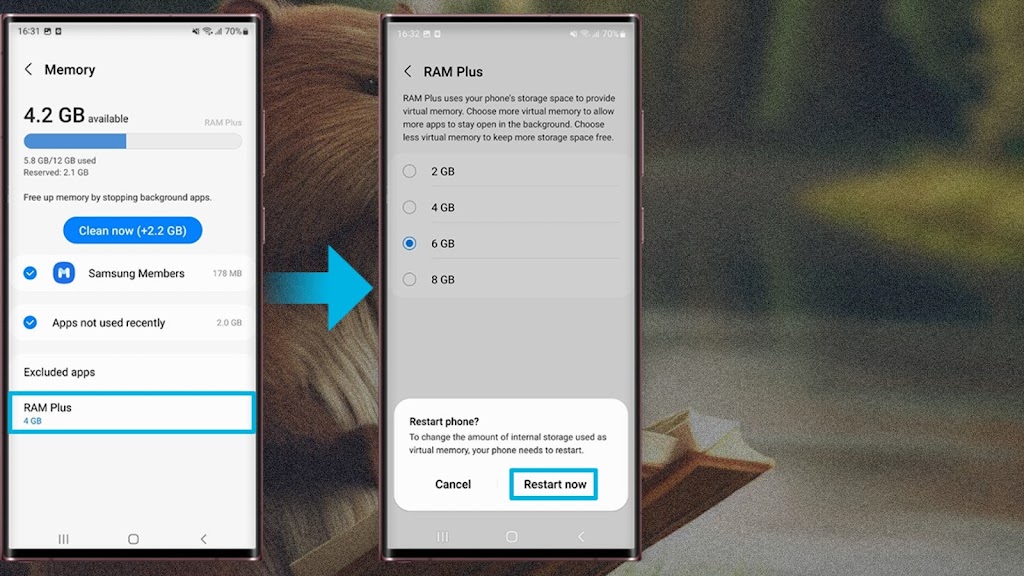
When it comes to maximizing the performance of your Samsung phone one often overlooked feature is RAM+. RAM+ is a feature on Samsung phones that allows you to allocate a portion of your device’s storage as virtual RAM effectively increasing your phone’s available random-access memory (RAM).

Step 1: Check Device Compatibility

Before proceeding with the setup verify that your Samsung phone supports the RAM+ feature. Not all Samsung models have this feature and it may vary depending on the phone’s hardware specifications. To check if your device supports RAM Plus:
  1. Go to the Settings menu on your Samsung phone.
  2. Scroll down and tap on “About Phone” or “About Device.”
  3. Look for the “Model number” or “Device Model.” Note down this information.
Now perform a quick internet search using your device model number and the keyword “RAM+ compatibility.” You should be able to find reliable sources confirming whether or not your Samsung phone supports the feature.

Step 2: Update Your Phone’s Software

Ensure that your Samsung phone is up to date with the latest software version. Manufacturers often release updates that include bug fixes and feature enhancements which may include improvements to the RAM Plus feature. To check for updates:
  1. Open the Settings menu on your Samsung phone.
  2. Scroll down and tap on “Software update” or “System update.”
  3. Tap on “Download and install” if an update is available.
Follow the on-screen instructions to complete the update process. It is recommended to have a stable internet connection and sufficient battery charge before initiating the update.

Step 3: Enable RAM Plus on Your Samsung Phone

Once you have confirmed device compatibility and updated your phone’s software proceed with enabling the RAM+ feature:
  1. Open the Settings menu on your Samsung phone.
  2. Scroll down and tap on “Device care” or “Device maintenance.”
  3. Within the device care settings select “Memory” or “Memory management.”
  4. Look for the RAM  + option and tap on it.
  5. Enable RAM+ by toggling the switch or following the prompts.
It is worth noting that enabling RAM+ will allocate a portion of your device’s storage space as virtual RAM which means less storage capacity will be available for other data on your phone. Ensure that you have sufficient space available before enabling this feature.

Step 4: Optimize and Monitor RAM+ Usage

Now that RAM+ is enabled on your Samsung phone it is essential to optimize its usage for maximum performance:
  1. Within the RAM Plus settings you may find different RAM+ modes. These modes control how your phone utilizes the allocated virtual RAM. Experiment with different modes to find the one that suits your usage pattern best.
  2. From time to time check the RAM+ settings to monitor the usage and ensure that it is being efficiently utilized.
  3. If you encounter any performance issues after enabling RAM such as reduced storage availability or decreased battery life consider adjusting the RAM+ settings or disabling the feature temporarily.
Need to use your hard drive as RAM on windows, check out this article from Tech Tutorials Hub
Categories
Android Apps how to's Tutorials Zimbabwe

Guide to Setting Up RCS Chats on Google Messages for your Econet SIM card

Rich Communication Services (RCS) is a next-generation messaging protocol that brings enhanced features and functionality to your messaging app and Econet now has it. Google Messages the default messaging app on Android devices supports RCS and allows you to have a more interactive messaging experience. In this article I am going to you through the process of setting up RCS chats on Google Messages.

Step 1: Check for RCS Support

Before proceeding ensure that your mobile carrier and device are compatible with RCS. Google Messages currently supports RCS in partnership with many carriers worldwide. To check if your device is compatible open the Google Messages app and look for the “RCS chats” option in the settings menu. If you don’t see it it may indicate that your device or carrier does not yet support RCS.

Step 2: Update Google Messages

To make sure you have the latest version of Google Messages go to the Google Play Store on your Android device and search for “Google Messages.” If an update is available click on the “Update” button. Keeping your app up to date ensures you have access to the latest features and improvements.

Step 3: Enable RCS chats

Once you have confirmed RCS support and updated Google Messages open the app and follow these steps to enable Chat Features:

  1. Open the Google Messages app on your Android device.
  2. Tap on your profile picture icon located in the top right corner of the screen.
  3. Select “Messaging Settings” from the drop-down menu.
  4. In the settings menu tap on “RCS chats.”
  5. If you see the “Enable RCS chats” option tap on it and wait for the process to complete.


Note: It may take a few minutes to activate RCS.

Step 4: Verify Phone Number

Once RCS is enabled you will need to verify your phone number before you can start using RCS features. To verify your phone number:

  1. In the RCS chats section, tap on “Verify Phone Number.”
  2. Follow the on-screen instructions to verify your phone number if it isn’t verified automatically.

Step 5: Explore RCS Features

After completing the verification process you can now enjoy the enhanced capabilities of RCS in Google Messages. RCS includes features like read receipts typing indicators high-quality media sharing and more. You can take advantage of these features when communicating with other RCS-enabled devices and users. Below is an example of an RCS chat:

Step 6: Spread the Word

Once you have successfully set up RCS chats on Google Messages don’t forget to spread the word to your friends and family. Encourage them to enable RCS on their devices and start enjoying the enhanced messaging experience together (you can even send them this post ;). RCS chats work seamlessly with contacts using RCS-supported apps on Android devices. 

Conclusion

Setting up RCS chats on Google Messages offers a more interactive and engaging messaging experience. By following the steps outlined in this guide you can enable RCS and access its enhanced features. Make sure to check for RCS support update your Google Messages app enable chat features verify your phone number and explore the various RCS functionalities available. Enjoy a richer messaging experience with RCS on Google Messages!

Categories
Android how to's Windows

How to unlock any device using CMD (Command Prompt)

 Android as we know it has become one of the most used mobile phone Operating System. Many companies are now resolving to Android because of it’s rate of growth e.g Nokia. Due to this Android has become the hub for experiments, hacking, cheats e.t.c. In matters of privacy, some people are very stingy about their privacy to the point of inserting a hard to guess pin/password/pattern hence also forgetting their unlocking method. As I mentioned earlier Android has become a hub of cheats, that’s why we wrote this article on how to unlock your Android device using CMD.

Step 1. First of all, connect your Android device with your PC from USB Cable.

Step 2. Now you need to Download and Install ADB Files with Driver in your PC.

Step 3. Now Press Window + R button and type CMD. When you press Enter, you see Command Prompt in your Screen.

Step 4. Type “adb devices” and press enter.

Step 5. Now type below commands one by one and press enter.

  • adb shell
  • su
  • rm /data/system/gesture.key
Step 6. That’s It! Now need to open your Android Phone screen and make any pattern.

Categories
Followers how to's Instagram

How to gain Instagram followers for free

 Instagram has become the best free, online photo-sharing application and social network platform worldwide. And to those who believe having a lot of Instagram followers is ‘cool’ or makes you look popular there are apps and sites that help you get ‘free’ and ‘paid’ Instagram followers. But hey who would pay to get Instagram followers when there are apps providing them for free. One good example is Hiketop+ and that is the app we’re focusing on today.

Step 1: Login

Open the Hiketop+ app and login to your existing Instagram account. Once logged in press the ‘Logged In’ button to proceed.

Step 2: Earn crystals

Crystals are the sole to earning with Hiketop+. You earn crystals by following people, liking images and videos, e.t.c. Following people gives you 8 crystals per follow so all you need is to keep on following until you have 39+ crystals.

Step 3: Earning followers

Now let’s get to the part we have all been waiting for ‘getting the followers’. To earn followers press the ‘stay on top’ button that will get you to the top of the following list for a minute NB THIS WILL USE 39 CRYSTALS.

Voila you’re now earning followers for the next minute. To earn up to 3k followers keep on doing this till you have your desired number of followers. You can always unfollow those people whom you followed.

Click here to get the app 

Categories
Android how to's

How to unlock your phone using the emergency call option, if you have forgotten your password

Is it possible to bypass Android lock screen using emergency call? Yes. The guide tell you how to unlock Android phone using emergency call.

In some Android devices, we are able to bypass its lock screen with this method. As you know, we can make an emergency call even when a device is locked. Therefore, the technique exploits this and tries to unlock the device. Ideally, it is a security loophole that was later fixed in Android 5. The chances are that the solution would only work if your device is running on Android 4.4 or an earlier version. To learn how to unlock the phone using emergency call, follow these steps:

Steps on unlocking your phone

1. Enter a string of special symbols. For instance, you can simply type asterisks (*) a few consecutive times.
Double-tap it to highlight the string and copy it.
2. Tap on the screen again and paste the copied string. Repeat the process a few more times (ideally 10 or 11) until you cannot highlight the string.

3. Now, go back to the lock screen. Tap on the camera icon (or swipe left) to launch the Camera app. At the same time, pull the notification bar from the top.
Go to your device settings by tapping on the gear icon at the top of the screen.

4. Keep pasting the string until the interface would be crashed. The lock screen will disappear and be extended to the Camera’s interface instead.
In some time, the camera app will subsequently crash as well and the device would be unlocked.
5. In the end, the home screen of the device would be displayed so that you can easily access your phone. By following this stepwise drill, you can learn how to unlock Android using emergency call.