Categories
Android Apps Entertainment

Top 5 Soccer Games for Android: Kick Off the Fun on the Go!

Soccer also known as football is the most popular sport worldwide. Whether you’re a die-hard fan or enjoy playing games on your Android device there’s no shortage of fantastic soccer games available. From immersive gameplay to stunning graphics these games bring the excitement of the beautiful game right to your fingertips. So are you ready to lace up your boots and hit the virtual pitch? Let’s dive into the top 5 soccer games for Android!

FIFA Soccer

FIFA Soccer is without a doubt one of the most iconic soccer game franchises. This mobile version offers an immersive soccer experience with realistic graphics and smooth gameplay. With an extensive roster of real players teams and stadiums you can lead your favorite club to victory in various game modes including Career Mode UEFA Champions League and Head-to-Head matches with friends online. The game constantly updates with new events advancements and fresh content keeping you engaged throughout the season.

PES Mobile

Pro Evolution Soccer (PES) is another popular soccer game series loved by millions of fans globally. In PES Mobile you can create your dream team with real players from around the world. The game boasts remarkable visuals realistic player animations and a diverse range of tactical options making it a joy to play. PES Mobile also features online multiplayer matches challenging tournaments and a highly praised Master League mode where you can manage your team to greatness.

Score Hero

Score! Hero offers a unique and addictive soccer gaming experience. In this game you play as a rising star following an engrossing storyline through different levels. You control the movement and actions of the protagonist during key moments including scoring goals providing assists and making crucial decisions. With over 800 levels each with its own challenges and game scenarios Score! Hero keeps you hooked as you progress through the ranks and strive for glory.

Dream League Soccer 2023

Dream League Soccer puts you in charge of a budding soccer team allowing you to build and manage your club from scratch. You can customize your team’s logo kits and stadium sign top players and compete in various leagues and tournaments to conquer the soccer world. The game offers realistic gameplay mechanics smooth controls and stunning visuals. With its immersive career mode and online multiplayer option Dream League Soccer guarantees endless hours of soccer fun on your Android device.

Head Ball 2

If you’re looking for a fast-paced arcade-style soccer game look no further than Head Ball 2. In this wacky and thrilling multiplayer game you compete against players worldwide in one-on-one duels. The twist? You control a cartoonish character who hits the ball with their head! With unique power-ups challenging arenas and character customization options Head Ball 2 offers a refreshing and entertaining take on the traditional soccer game genre.

Conclusion

Soccer games for Android provide an incredible opportunity to immerse yourself in the world’s most beloved sport whenever and wherever you want. From the realism of FIFA Soccer and PES Mobile to the addictive gameplay of Score! Hero and Dream League Soccer and the fun-filled chaos of Head Ball 2 you’ll find a soccer game tailored to your taste. So lace up your virtual boots grab your Android device and get ready to take on the opposition in the top 5 soccer games for Android. The ball’s at your feet – enjoy the game!

Categories
Android Chrome Software

Useful Chrome Flags for Android and How to Enable Them


Chrome flags are experimental features in the Chrome browser that allow users to customize and enhance their browsing experience. With a plethora of flags available Android users can unlock exciting features and improve their productivity. In this article I will explore some useful Chrome flags for Android and guide you on how to enable them.

Enabling the flags

The process is simple. To enable a Chrome flag, all you need to do is to go to chrome://flags then search the name of the flag and change from default to enabled. 

Incognito Screenshot

By enabling this flag you can capture screenshots while browsing in incognito mode. It’s a handy feature for quickly saving or sharing important information from private browsing sessions. To enable it, go to chrome://flags and search ‘Incognito screenshot’

Device Reauthentication for Incognito

With this flag enabled Chrome will request a device authentication (fingerprint PIN or biometric) every time you open an incognito tab. This adds an extra layer of privacy and prevents unauthorized access to your incognito browsing data. To enable it, go to chrome://flags and search for ‘Device reauth’

Biometric Reauth for Password Filling

Enabling this flag enhances the security of autofilling passwords. It ensures that biometric authentication is required for Chrome to fill in saved passwords providing an additional layer of protection against unauthorized access. To enable it, go to chrome://flags and search ‘biometric’

Web Feed

By enabling this flag you gain access to a personalized feed of articles and content based on your interests. It offers a convenient way to discover new information and stay updated on topics that matter to you. To enable it, go to chrome://flags and search for ‘web feed’

Parallel Downloading

Enabling this flag enables Chrome to split large file downloads into smaller chunks allowing for faster and more efficient downloads. It’s particularly beneficial for those who frequently download large files on their Android devices. To enable it, go to chrome://flags and search for ‘parallel’

Start Surface

This flag introduces a revamped start page in Chrome providing a more organized and visually appealing way to access your most visited websites bookmarks and recent search history. To enable it, go to chrome://flags and search for ‘start surface’

Dark Mode for Webpages

By enabling this flag Chrome can automatically convert web pages to dark mode providing a more comfortable browsing experience in low-light conditions and reducing eye strain. To enable it, go to chrome://flags and search for ‘dark mode’

Enable Smooth Scrolling

Enabling this flag enhances the scrolling experience in Chrome making it smoother and more fluid. It can be particularly beneficial on devices with high refresh rate displays. To enable it, go to chrome://flags and search ‘smooth scrolling’

Chrome flags provide Android users with the ability to tailor their browsing experience and unlock exciting features. By enabling these flags you can enhance productivity privacy and overall browsing enjoyment.

Categories
Android Apps how to's Security Tutorials

Rooting Your Android Device Using Magisk


Rooting your Android device can unlock a whole range of possibilities allowing you to customize optimize and enhance your device beyond its stock limitations. One popular method of rooting is by using Magisk. Let’s see how it’s done.

Steps

  1. Understanding the Boot Image:

    •   The boot image is an essential part of the Android operating system that contains the kernel and ramdisk.
    • Rooting via Magisk modifies the boot image enabling you to gain root access without altering the system partition.

    2. Prerequisites:

    • Before you begin ensure that your device’s bootloader is unlocked. (If not, search for how to unlock the bootloader of your specific device on google)
    • Backup your data to prevent any potential loss during the rooting process.
    • Charge your device to a sufficient battery level to avoid unexpected shutdowns.

    3. Download Magisk and Required Files:

    •  Obtain the latest version of Magisk Manager APK from the developer’s website.
    • Download the correct boot image for your device’s specific firmware.

    4. Patching the Boot Image:

    • Launch the Magisk Manager app.
    • Tap on the “Install” button and select “Install” from the pop-up menu.
    • Choose “Select and Patch a File” and locate the downloaded boot image.
    • Magisk Manager will patch the boot image creating a patched_boot.img file.

  5. Flashing the Patched Boot Image:

    • Connect your device to your computer using a USB cable.
    • Boot your device into fastboot mode by turning it off then pressing a specific key combination (varies by device).
    • Open a command prompt or terminal window on your computer.
    • Use the fastboot command to flash the patched boot image to your device:

        fastboot flash boot <path_to_patched_boot.img>

   6. Rebooting Your Device:

    • Once the boot image is successfully flashed reboot your device by executing the following command:

        fastboot reboot

  7. Verify Root Access:

    • After your device boots up open the Magisk Manager app.If you see a “Congratulations!” message it means your device is successfully rooted using Magisk.
    • You can also use root-checking applications from the Play Store to verify root access.

  8. Managing Modules and Systemless Modifications:

    • Magisk allows you to install modules which are system modifications that can enhance your rooted device.
    • Open Magisk Manager tap on the “Modules” option and select the desired module to install.
    • Magisk also lets you enable or disable systemless modifications from the app’s settings.

Conclusion

Rooting your Android device using Magisk not only gives you administrative control over your device but also opens up a world of customization possibilities. Remember to exercise caution and backup your data before starting the rooting process.

Categories
Android how to's Software Tutorials

Setting up RAM Plus on your Samsung device


When it comes to maximizing the performance of your Samsung phone one often overlooked feature is RAM+. RAM+ is a feature on Samsung phones that allows you to allocate a portion of your device’s storage as virtual RAM effectively increasing your phone’s available random-access memory (RAM).

Step 1: Check Device Compatibility

Before proceeding with the setup verify that your Samsung phone supports the RAM+ feature. Not all Samsung models have this feature and it may vary depending on the phone’s hardware specifications. To check if your device supports RAM Plus:
  1. Go to the Settings menu on your Samsung phone.
  2. Scroll down and tap on “About Phone” or “About Device.”
  3. Look for the “Model number” or “Device Model.” Note down this information.
Now perform a quick internet search using your device model number and the keyword “RAM+ compatibility.” You should be able to find reliable sources confirming whether or not your Samsung phone supports the feature.

Step 2: Update Your Phone’s Software

Ensure that your Samsung phone is up to date with the latest software version. Manufacturers often release updates that include bug fixes and feature enhancements which may include improvements to the RAM Plus feature. To check for updates:
  1. Open the Settings menu on your Samsung phone.
  2. Scroll down and tap on “Software update” or “System update.”
  3. Tap on “Download and install” if an update is available.
Follow the on-screen instructions to complete the update process. It is recommended to have a stable internet connection and sufficient battery charge before initiating the update.

Step 3: Enable RAM Plus on Your Samsung Phone

Once you have confirmed device compatibility and updated your phone’s software proceed with enabling the RAM+ feature:
  1. Open the Settings menu on your Samsung phone.
  2. Scroll down and tap on “Device care” or “Device maintenance.”
  3. Within the device care settings select “Memory” or “Memory management.”
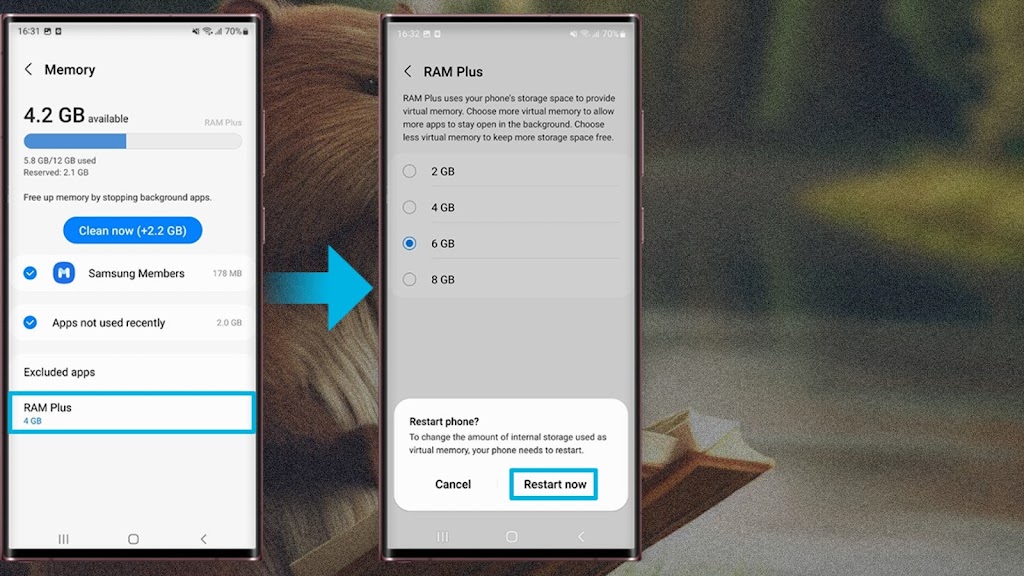
  4. Look for the RAM  + option and tap on it.
  5. Enable RAM+ by toggling the switch or following the prompts.
It is worth noting that enabling RAM+ will allocate a portion of your device’s storage space as virtual RAM which means less storage capacity will be available for other data on your phone. Ensure that you have sufficient space available before enabling this feature.

Step 4: Optimize and Monitor RAM+ Usage

Now that RAM+ is enabled on your Samsung phone it is essential to optimize its usage for maximum performance:
  1. Within the RAM Plus settings you may find different RAM+ modes. These modes control how your phone utilizes the allocated virtual RAM. Experiment with different modes to find the one that suits your usage pattern best.
  2. From time to time check the RAM+ settings to monitor the usage and ensure that it is being efficiently utilized.
  3. If you encounter any performance issues after enabling RAM such as reduced storage availability or decreased battery life consider adjusting the RAM+ settings or disabling the feature temporarily.
Need to use your hard drive as RAM on windows, check out this article from Tech Tutorials Hub
Categories
Android Apps how to's Tutorials Zimbabwe

Guide to Setting Up RCS Chats on Google Messages for your Econet SIM card

Rich Communication Services (RCS) is a next-generation messaging protocol that brings enhanced features and functionality to your messaging app and Econet now has it. Google Messages the default messaging app on Android devices supports RCS and allows you to have a more interactive messaging experience. In this article I am going to you through the process of setting up RCS chats on Google Messages.

Step 1: Check for RCS Support

Before proceeding ensure that your mobile carrier and device are compatible with RCS. Google Messages currently supports RCS in partnership with many carriers worldwide. To check if your device is compatible open the Google Messages app and look for the “RCS chats” option in the settings menu. If you don’t see it it may indicate that your device or carrier does not yet support RCS.

Step 2: Update Google Messages

To make sure you have the latest version of Google Messages go to the Google Play Store on your Android device and search for “Google Messages.” If an update is available click on the “Update” button. Keeping your app up to date ensures you have access to the latest features and improvements.

Step 3: Enable RCS chats

Once you have confirmed RCS support and updated Google Messages open the app and follow these steps to enable Chat Features:

  1. Open the Google Messages app on your Android device.
  2. Tap on your profile picture icon located in the top right corner of the screen.
  3. Select “Messaging Settings” from the drop-down menu.
  4. In the settings menu tap on “RCS chats.”
  5. If you see the “Enable RCS chats” option tap on it and wait for the process to complete.


Note: It may take a few minutes to activate RCS.

Step 4: Verify Phone Number

Once RCS is enabled you will need to verify your phone number before you can start using RCS features. To verify your phone number:

  1. In the RCS chats section, tap on “Verify Phone Number.”
  2. Follow the on-screen instructions to verify your phone number if it isn’t verified automatically.

Step 5: Explore RCS Features

After completing the verification process you can now enjoy the enhanced capabilities of RCS in Google Messages. RCS includes features like read receipts typing indicators high-quality media sharing and more. You can take advantage of these features when communicating with other RCS-enabled devices and users. Below is an example of an RCS chat:

Step 6: Spread the Word

Once you have successfully set up RCS chats on Google Messages don’t forget to spread the word to your friends and family. Encourage them to enable RCS on their devices and start enjoying the enhanced messaging experience together (you can even send them this post ;). RCS chats work seamlessly with contacts using RCS-supported apps on Android devices. 

Conclusion

Setting up RCS chats on Google Messages offers a more interactive and engaging messaging experience. By following the steps outlined in this guide you can enable RCS and access its enhanced features. Make sure to check for RCS support update your Google Messages app enable chat features verify your phone number and explore the various RCS functionalities available. Enjoy a richer messaging experience with RCS on Google Messages!

Categories
Android Apps Websites

Top 10 Android Graphic Designing softwares for high creativity


In today’s digital age graphic design has become an integral part of our lives. Whether you’re a professional graphic designer or an aspiring creative having access to user-friendly graphic designing software is essential. With the evolution of smartphones and tablets design tools are no longer limited to desktop applications. Android graphic designing software provides a portable and convenient way to bring your creative ideas to life on the go. In this article I am going to explore the top 10 Android graphic designing software options available including Canva, PicsArt, Adobe Express and Pixellab.

Canva

Canva is a popular web-based design tool known for its ease of use. The Android app brings the same functionality to your mobile device. With a vast library of templates fonts and stock images Canva allows you to create stunning designs for social media posts presentations banners and more.

Adobe Express

Adobe Express a mobile version of Adobe Photoshop is a powerful Android graphic designing software. It offers a wide range of editing features like cropping retouching and adding filters to your photos. Its user-friendly interface and integration with Adobe Creative Cloud make it an excellent tool for editing and enhancing images on the go.

Pixellab

Pixellab is another popular Android graphic designing software that specializes in adding text and graphics to images. With a variety of fonts stickers and effects Pixellab allows you to create unique and eye-catching designs. It also supports 3D text effects giving your designs an extra dimension.

Infinite Design

Infinite Design offers a comprehensive set of vector editing tools for Android. It enables you to create scalable vector graphics illustrations logos and more. The app provides layers grids and shape tools giving you the flexibility to create intricate designs with precision.

SketchBook

SketchBook by Autodesk is a professional-grade drawing and painting tool available for Android devices. With a wide range of brushes pens and blending options artists can create stunning digital art on their mobile devices. SketchBook supports layers symmetry tools and time-lapse recording making it a versatile option for both beginners and professionals.

ArtFlow

ArtFlow is a feature-rich Android graphic designing software suitable for digital artists. It offers a variety of brushes layers and blending modes allowing you to create intricate paintings and illustrations. The app supports pressure sensitivity making it feel like you’re working with traditional art supplies.

Adobe Illustrator Draw

Adobe Illustrator Draw is a vector-based drawing app that turns your Android device into a portable sketchbook. The app provides a collection of customizable brushes layers and various drawing tools enabling you to create professional-grade artwork. It seamlessly integrates with Adobe Creative Cloud allowing you to start your projects on the go and continue working on your desktop.

MediBang Paint

MediBang Paint is a popular Android graphic designing software that offers a wide range of unique brushes comic book panels and screen tones. It is an excellent choice for comic book artists and manga enthusiasts. The app also supports cloud storage and collaboration making it easy to work on projects with others.

PicsArt

PicsArt is a powerful photo editing and graphic design app that offers a comprehensive set of tools and creative features. From photo editing and collages to drawing and digital art PicsArt provides a variety of options to enhance and transform your images. The app also offers a vibrant social media community for sharing and exploring creations.

Desygner

Desygner is a flexible Android graphic designing software that allows you to create designs for various purposes including social media marketing materials and presentations. With its extensive library of templates and customization options Desygner makes it easy to create visually appealing designs without prior design experience.

Conclusion

With the advancements in technology Android graphic designing software options have become more versatile and user-friendly than ever before. Whether you’re a professional designer or just exploring your creative side these top 10 Android graphic designing software options provide an array of tools and features to bring your ideas to life on the go. So grab your Android device and unleash your creativity anytime anywhere!
Categories
Android Apps eCommerce Websites

Zimbabwean Marketplace Series: Ownai

 Exactly 10 days after my last article, I return and we continue our marketplace website series, this being day 4. My apologies for being away for the past 10 days, I was working on my portfolio, tino.co.zw which I’m happy to announce that it’s finally online.

As I promised , day 4 will be about Ownai since I was supposed to write about it on day 3. 

Ownai

Ownai is a Cassava Smarttech startup that has almost everything a Zimbabwean would look for in a marketplace. Yeah I gotta break it to you, I’m impressed. Ownai comes with the normal marketplace look whilst including it’s own features. Let’s dig in deeper.

How you can find them

Ownai has a website, ownai.co.zw and mobile apps for both Android and iOS available on their respective stores.

The UI

Ownai comes with a great and usable UI which has a few notable flaws. Firstly the site takes a lot of time to load, displaying it’s preloader on all of the products on the home screen, which drives away potential impatient customers, which is bad. Even the Google Pagespeed Insights test proved this as the site only got a positive result on SEO, you can see for yourself.

Judging by the results, Ownai has a lot to improve. Upon my first trial to view the site, I came across the annoying preloaders but I had to wait for it to load, although it took a lot of time. For someone who’s used to Netone’s bad reception, I thought it was because of my network but after the Pagespeed Insights results, I became certain it wasn’t because of my network. Here’s the screenshot of the specific section.

Content

It’s perfect. That’s what I can say briefly as Ownai comes with perfectly categorized and grouped content. Which I really loved. Their menu has it all, under the correct categories. They even have a gaming category, where you’ll get some of the most popular PC games for sale. See, it’s perfect! 

Conclusion

Ownai has a lot of products available for sale from various sellers too. Their site is perfectly stocked and categorized. The only flaw with Ownai is the time it takes loading, but it’s not really long though. So if you’re looking for a marketplace to sell your products, or to buy something you’re looking for, Ownai is the perfect choice.

Categories
Android WhatsApp

Oops. Might have jumped to conclusions too soon regarding the GB issue

 So it turns out it might have just been my number which was getting that error message and I might have jumped to conclusions regarding the GB issue. Of course I misinterpreted the situation but at the same time there’s still hope for my dream to come true. I guess.

Last night I revisited my GB WhatsApp once again to check if I was still getting this error:

And unfortunately, I was still getting it. But then I decided to try it with a different number to see what I’d get and to my surprise, the app worked. Now all I can say is the end is now near but it isn’t exactly here. Wow, that rhymed๐Ÿ˜. You can also check the previous article regarding WhatsApp mods: Is the death of WhatsApp mods finally here?

Categories
Android Apps WhatsApp

Is the death of WhatsApp mods finally here?


Seeing my greatest enemy go down has been my dream. WhatsApp mods(all wrapped up in the name GBWhatsApp) have been on my nerve since day one. Honestly speaking, I never liked those things at all. I think I speak for most when I say my dream was to see these WhatsApp mods go down one day. To my surprise, I think that day is coming soon.

The downfall of WhatsApp mods might just be near after what I witnessed today. Even though I hated the anti delete features and the hiding features a lot, unfortunately the GBWhatsApp was also an essential for me. Funny coincidence. It’s more like my wish for the downfall of mods is the same as praying for my own disadvantage. Till date, I’ve been using the GBWhatsApp on my spare line for sending links in multiple groups(up to 70) at the same time. This was the main reason I had the app on my phone till now but lately I was banned. This wasn’t nothing new to me as I’ve been banned on this number multiple times and the fact that it’s a second number, it doesn’t really hurt me to be banned. But after my number was approved, I wanted to login to the app, so that I would send my new article’s link to my groups as usual and that’s when I got this message.

Initially I thought it would happen for this login trial only so I installed a WhatsApp clone through the dual app option in the phone settings and logged into my WhatsApp with the clone. After this, I went back to my GB to login to my number and still got the same message. Tried clearing data and uninstalling and reinstalling the app but it was of now use.

 This event made me both elated and disappointed at the same time as it gave me assurance that this is likely going to happen to most WhatsApp mod users but I also lost my ability to send a message to 70 groups once. But anyways it’s a win win if this happens to everyone else. If you’re or you were using a WhatsApp mod, share your current experience with the app through the comment section. 

Categories
Android

Useful Android codes you might want to know

Image Credit: NextPit

Android is the most popular smartphone OS ever. Developers create various kinds of backdoor within the applications and operating systems. Through these backdoors, any user who has sufficient knowledge can get into the much deeper system as compare to other users.

As we all know, Android is an open-source operating system based on Linux Kernel and developed by Google. The android operating system is being widely used in the world. Android developers also create many backdoors through which you can enter into the system, and you can change settings.
It is not meant to use these backdoors for malicious intent because developers block some modes and these backdoor are the way or allow the users to enter into the system and let them become familiar to the system. 

In smartphones, these backdoor are called โ€œsecret codes.โ€ Please note that some of these secret codes won’t work on Samsung devices. 

Common Android Secret Codes

Secret Codes Functions

*#*#7780#*#* Factory restore setting

*#*#7780#*#* Clear all applications and data.

*#*#7780#*#* Remove Google account setting.

*#*#7780#*#* Remove System, application data, and settings.

*2767*3855# Reinstall the phoneโ€™s firmware.

*2767*3855# Used for factory format.

*2767*3855# Remove all files and settings including the internal storage.

*2767*3855# Reinstall the firmware.

*#*#197328640#*#* Enabling test mode for service activity.

*#*#197328640#*#* Used to enter into Service mode.

*#*#197328640#*#* You can run and change various tests and settings in the service mode.

*#*#4636#*#* Phone basic information.

*#*#4636#*#* Phone usage detail.

*#*#4636#*#* Battery information.

*#*#34971539#*#* Information about mobile camera.

*#*#34971539#*#* Get camera information.

*#*#34971539#*#* Note:-Please avoid updating the camera firmware option

*#*#7594#*#* Changing the power button behavior.

*#*#7594#*#* Enables the direct power off without asking for selecting any option (silent mode, Aeroplane, and power off).

*#*#273283*255*663282*#*#* Create backup to all your media files.

*#*#273283*255*663282*#*#* Opens a file copy screen where you can backup your media files like (images, videos and audio).

*#*#8255#*#* For Google Talk service monitoring.

*#*#8255#*#* Used to launch G Talk Service Monitor.

*2767*4387264636* Used to display product code.

*#0228# Used to know Battery Status.

*#12580*369* Software and Hardware Info.

*#32489# Let you know Ciphering Info.

*#273283*255*3282*# Data create menu.

*#3282*727336*# Data usage status.

*#8736364# OTA update menu

WLAN, GPS, And Bluetooth Test Android Secret Codes

Codes Functioning

*#*#526#*#*

*#*#528#*#*

*#*#232339#*#* WLAN Test.

*#*#1472365#*#* For a quick GPS test.

*#*#232338#*#* Displays/Shows WiFi MAC address.

*#*#232337#*# Displays Bluetooth device address.

*#*#1575#*#* Different types of GPS tests.

*#*#232331#*#* Bluetooth test.