Categories
Security Software Windows

Tiny 11 vs. Windows 11: My two cents


Operating systems play a crucial role in our digital lives by providing a platform to interact with our devices. The release of Windows 11 generated a wave of excitement and anticipation among users. In this post we I compare Windows 11 the latest iteration of the Windows OS with Tiny 11 an alternative operating system that offers a lightweight approach.

Compatibility and System Requirements

Windows 11 requires specific hardware requirements including a 64-bit CPU at least 4GB of RAM and 64GB of storage among other specifications. These requirements might pose a challenge for older devices. In contrast Tiny 11 is designed to run on resource-constrained systems making it an attractive option for older hardware and low-end devices.

Features and Customization

Windows 11 introduces new features such as Snap Layouts, Snap Groups and Microsoft Teams integration. It focuses on productivity with enhancements to multitasking gaming and entertainment experiences. In terms of customization users have more control over personalizing their desktops including new themes wallpapers and widgets.

While Tiny 11 may lack certain advanced features found in Windows 11 its core strength lies in its lightweight and fast performance. It is optimized to run smoothly on low-powered machines providing a stripped-down interface that minimizes distractions and maximizes efficiency.

App Ecosystem and Development

Windows 11 benefits from a vast application ecosystem. It supports a wide range of software and games with compatibility for both traditional Win32 applications and modern Universal Windows Platform (UWP) apps. This vast app library makes it easier to find and use applications tailored to specific needs.

Tiny 11 although not as extensive focuses on simplicity and essential applications. It includes a selection of lightweight apps that cover essential functions such as web browsing office productivity media playback and file management. While the app ecosystem for Tiny 11 may be limited it offers a hassle-free experience without the bloat associated with larger operating systems.

Privacy and Security

Both Windows 11 and Tiny 11 prioritize privacy and security but they adopt different approaches. Windows 11 comes with enhanced security features such as TPM 2.0 Secure Boot and Microsoft Defender Antivirus. Tiny 11 while not offering the same level of native security features benefits from its lightweight nature making it less susceptible to malware and cyber threats due to its reduced attack surface.

Conclusion

Choosing between Tiny 11 and Windows 11 depends on users’ requirements and preferences. Windows 11 offers a visually appealing and feature-rich operating system suitable for modern hardware with a robust application ecosystem. On the other hand Tiny 11 targets users seeking a lightweight and fast experience on low-powered devices or those looking to simplify their computing environment. Ultimately the choice between these operating systems comes down to individual priorities – whether it’s performance feature set customization options or device compatibility. By thoroughly evaluating these factors and considering your specific needs you can make an informed decision that aligns with your preferences.
Categories
Android Apps how to's Security Tutorials

Rooting Your Android Device Using Magisk


Rooting your Android device can unlock a whole range of possibilities allowing you to customize optimize and enhance your device beyond its stock limitations. One popular method of rooting is by using Magisk. Let’s see how it’s done.

Steps

  1. Understanding the Boot Image:

    •   The boot image is an essential part of the Android operating system that contains the kernel and ramdisk.
    • Rooting via Magisk modifies the boot image enabling you to gain root access without altering the system partition.

    2. Prerequisites:

    • Before you begin ensure that your device’s bootloader is unlocked. (If not, search for how to unlock the bootloader of your specific device on google)
    • Backup your data to prevent any potential loss during the rooting process.
    • Charge your device to a sufficient battery level to avoid unexpected shutdowns.

    3. Download Magisk and Required Files:

    •  Obtain the latest version of Magisk Manager APK from the developer’s website.
    • Download the correct boot image for your device’s specific firmware.

    4. Patching the Boot Image:

    • Launch the Magisk Manager app.
    • Tap on the “Install” button and select “Install” from the pop-up menu.
    • Choose “Select and Patch a File” and locate the downloaded boot image.
    • Magisk Manager will patch the boot image creating a patched_boot.img file.

  5. Flashing the Patched Boot Image:

    • Connect your device to your computer using a USB cable.
    • Boot your device into fastboot mode by turning it off then pressing a specific key combination (varies by device).
    • Open a command prompt or terminal window on your computer.
    • Use the fastboot command to flash the patched boot image to your device:

        fastboot flash boot <path_to_patched_boot.img>

   6. Rebooting Your Device:

    • Once the boot image is successfully flashed reboot your device by executing the following command:

        fastboot reboot

  7. Verify Root Access:

    • After your device boots up open the Magisk Manager app.If you see a “Congratulations!” message it means your device is successfully rooted using Magisk.
    • You can also use root-checking applications from the Play Store to verify root access.

  8. Managing Modules and Systemless Modifications:

    • Magisk allows you to install modules which are system modifications that can enhance your rooted device.
    • Open Magisk Manager tap on the “Modules” option and select the desired module to install.
    • Magisk also lets you enable or disable systemless modifications from the app’s settings.

Conclusion

Rooting your Android device using Magisk not only gives you administrative control over your device but also opens up a world of customization possibilities. Remember to exercise caution and backup your data before starting the rooting process.

Categories
Android how to's Software Tutorials

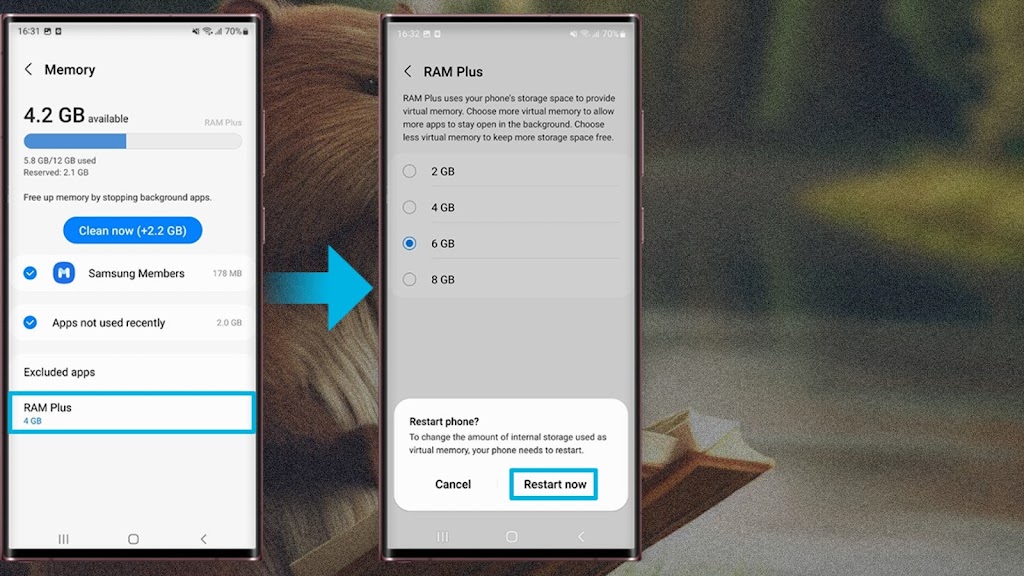
Setting up RAM Plus on your Samsung device


When it comes to maximizing the performance of your Samsung phone one often overlooked feature is RAM+. RAM+ is a feature on Samsung phones that allows you to allocate a portion of your device’s storage as virtual RAM effectively increasing your phone’s available random-access memory (RAM).

Step 1: Check Device Compatibility

Before proceeding with the setup verify that your Samsung phone supports the RAM+ feature. Not all Samsung models have this feature and it may vary depending on the phone’s hardware specifications. To check if your device supports RAM Plus:
  1. Go to the Settings menu on your Samsung phone.
  2. Scroll down and tap on “About Phone” or “About Device.”
  3. Look for the “Model number” or “Device Model.” Note down this information.
Now perform a quick internet search using your device model number and the keyword “RAM+ compatibility.” You should be able to find reliable sources confirming whether or not your Samsung phone supports the feature.

Step 2: Update Your Phone’s Software

Ensure that your Samsung phone is up to date with the latest software version. Manufacturers often release updates that include bug fixes and feature enhancements which may include improvements to the RAM Plus feature. To check for updates:
  1. Open the Settings menu on your Samsung phone.
  2. Scroll down and tap on “Software update” or “System update.”
  3. Tap on “Download and install” if an update is available.
Follow the on-screen instructions to complete the update process. It is recommended to have a stable internet connection and sufficient battery charge before initiating the update.

Step 3: Enable RAM Plus on Your Samsung Phone

Once you have confirmed device compatibility and updated your phone’s software proceed with enabling the RAM+ feature:
  1. Open the Settings menu on your Samsung phone.
  2. Scroll down and tap on “Device care” or “Device maintenance.”
  3. Within the device care settings select “Memory” or “Memory management.”
  4. Look for the RAM  + option and tap on it.
  5. Enable RAM+ by toggling the switch or following the prompts.
It is worth noting that enabling RAM+ will allocate a portion of your device’s storage space as virtual RAM which means less storage capacity will be available for other data on your phone. Ensure that you have sufficient space available before enabling this feature.

Step 4: Optimize and Monitor RAM+ Usage

Now that RAM+ is enabled on your Samsung phone it is essential to optimize its usage for maximum performance:
  1. Within the RAM Plus settings you may find different RAM+ modes. These modes control how your phone utilizes the allocated virtual RAM. Experiment with different modes to find the one that suits your usage pattern best.
  2. From time to time check the RAM+ settings to monitor the usage and ensure that it is being efficiently utilized.
  3. If you encounter any performance issues after enabling RAM such as reduced storage availability or decreased battery life consider adjusting the RAM+ settings or disabling the feature temporarily.
Need to use your hard drive as RAM on windows, check out this article from Tech Tutorials Hub
Categories
Apps eCommerce Websites

Zimbabwean Marketplace Series: Tisitano


Tisitano has emerged as a promising marketplace app connecting buyers and sellers across various categories. In this part of the series are going to look at Tisitano focusing on its design, speed and content to gauge its overall effectiveness as usual

Design

Tisitano boasts a sleek and user-friendly design allowing users to navigate the app effortlessly which is their greatest strength. The intuitive interface ensures that both buyers and sellers can easily understand and utilize its features. The clean layout and well-organized categories make it quick and simple to find products of interest. The inclusion of high-quality product images and detailed descriptions further enhances the overall user experience.

Speed

One of the crucial aspects of any marketplace app is its speed as slow loading times can deter users and negatively impact the overall user experience. Fortunately Tisitano performs exceptionally well in this aspect. The app loads quickly and efficiently minimizing waiting times and ensuring smooth browsing. This seamless experience encourages users to spend more time exploring the platform ultimately leading to increased engagement and better business opportunities. I for one was impressed by Tisitano’s speed but Google’s Pagespeed Insights thought the exact opposite. Or it’s just the website. Maybe. Below are the results. Had to shorten them this time but anyways, you can get an idea.

Content

A crucial aspect that sets Tisitano apart is its wide range of products and diverse content. The app accommodates various categories including electronics household items fashion vehicles and real estate among others. This diversity ensures that users have access to a wide array of options making it more likely to find what they are looking for. Additionally Tisitano allows sellers to create detailed product listings including descriptions pricing and contact information improving transparency, a business card for sellers and facilitating smoother transactions.
Furthermore Tisitano’s content management ensures only legitimate and verified sellers can list products. This helps to maintain a secure and reliable marketplace where users can confidently buy and sell without concerns about fraudulent activities. The built-in messaging system allows for direct communication between buyers and sellers facilitating negotiations and inquiries.

Conclusion

In conclusion Tisitano is a well-designed marketplace app that provides a range of features to enhance the buying and selling experience.
Categories
Android Apps how to's Tutorials Zimbabwe

Guide to Setting Up RCS Chats on Google Messages for your Econet SIM card

Rich Communication Services (RCS) is a next-generation messaging protocol that brings enhanced features and functionality to your messaging app and Econet now has it. Google Messages the default messaging app on Android devices supports RCS and allows you to have a more interactive messaging experience. In this article I am going to you through the process of setting up RCS chats on Google Messages.

Step 1: Check for RCS Support

Before proceeding ensure that your mobile carrier and device are compatible with RCS. Google Messages currently supports RCS in partnership with many carriers worldwide. To check if your device is compatible open the Google Messages app and look for the “RCS chats” option in the settings menu. If you don’t see it it may indicate that your device or carrier does not yet support RCS.

Step 2: Update Google Messages

To make sure you have the latest version of Google Messages go to the Google Play Store on your Android device and search for “Google Messages.” If an update is available click on the “Update” button. Keeping your app up to date ensures you have access to the latest features and improvements.

Step 3: Enable RCS chats

Once you have confirmed RCS support and updated Google Messages open the app and follow these steps to enable Chat Features:

  1. Open the Google Messages app on your Android device.
  2. Tap on your profile picture icon located in the top right corner of the screen.
  3. Select “Messaging Settings” from the drop-down menu.
  4. In the settings menu tap on “RCS chats.”
  5. If you see the “Enable RCS chats” option tap on it and wait for the process to complete.


Note: It may take a few minutes to activate RCS.

Step 4: Verify Phone Number

Once RCS is enabled you will need to verify your phone number before you can start using RCS features. To verify your phone number:

  1. In the RCS chats section, tap on “Verify Phone Number.”
  2. Follow the on-screen instructions to verify your phone number if it isn’t verified automatically.

Step 5: Explore RCS Features

After completing the verification process you can now enjoy the enhanced capabilities of RCS in Google Messages. RCS includes features like read receipts typing indicators high-quality media sharing and more. You can take advantage of these features when communicating with other RCS-enabled devices and users. Below is an example of an RCS chat:

Step 6: Spread the Word

Once you have successfully set up RCS chats on Google Messages don’t forget to spread the word to your friends and family. Encourage them to enable RCS on their devices and start enjoying the enhanced messaging experience together (you can even send them this post ;). RCS chats work seamlessly with contacts using RCS-supported apps on Android devices. 

Conclusion

Setting up RCS chats on Google Messages offers a more interactive and engaging messaging experience. By following the steps outlined in this guide you can enable RCS and access its enhanced features. Make sure to check for RCS support update your Google Messages app enable chat features verify your phone number and explore the various RCS functionalities available. Enjoy a richer messaging experience with RCS on Google Messages!

Categories
Android Apps Websites

Top 10 Android Graphic Designing softwares for high creativity


In today’s digital age graphic design has become an integral part of our lives. Whether you’re a professional graphic designer or an aspiring creative having access to user-friendly graphic designing software is essential. With the evolution of smartphones and tablets design tools are no longer limited to desktop applications. Android graphic designing software provides a portable and convenient way to bring your creative ideas to life on the go. In this article I am going to explore the top 10 Android graphic designing software options available including Canva, PicsArt, Adobe Express and Pixellab.

Canva

Canva is a popular web-based design tool known for its ease of use. The Android app brings the same functionality to your mobile device. With a vast library of templates fonts and stock images Canva allows you to create stunning designs for social media posts presentations banners and more.

Adobe Express

Adobe Express a mobile version of Adobe Photoshop is a powerful Android graphic designing software. It offers a wide range of editing features like cropping retouching and adding filters to your photos. Its user-friendly interface and integration with Adobe Creative Cloud make it an excellent tool for editing and enhancing images on the go.

Pixellab

Pixellab is another popular Android graphic designing software that specializes in adding text and graphics to images. With a variety of fonts stickers and effects Pixellab allows you to create unique and eye-catching designs. It also supports 3D text effects giving your designs an extra dimension.

Infinite Design

Infinite Design offers a comprehensive set of vector editing tools for Android. It enables you to create scalable vector graphics illustrations logos and more. The app provides layers grids and shape tools giving you the flexibility to create intricate designs with precision.

SketchBook

SketchBook by Autodesk is a professional-grade drawing and painting tool available for Android devices. With a wide range of brushes pens and blending options artists can create stunning digital art on their mobile devices. SketchBook supports layers symmetry tools and time-lapse recording making it a versatile option for both beginners and professionals.

ArtFlow

ArtFlow is a feature-rich Android graphic designing software suitable for digital artists. It offers a variety of brushes layers and blending modes allowing you to create intricate paintings and illustrations. The app supports pressure sensitivity making it feel like you’re working with traditional art supplies.

Adobe Illustrator Draw

Adobe Illustrator Draw is a vector-based drawing app that turns your Android device into a portable sketchbook. The app provides a collection of customizable brushes layers and various drawing tools enabling you to create professional-grade artwork. It seamlessly integrates with Adobe Creative Cloud allowing you to start your projects on the go and continue working on your desktop.

MediBang Paint

MediBang Paint is a popular Android graphic designing software that offers a wide range of unique brushes comic book panels and screen tones. It is an excellent choice for comic book artists and manga enthusiasts. The app also supports cloud storage and collaboration making it easy to work on projects with others.

PicsArt

PicsArt is a powerful photo editing and graphic design app that offers a comprehensive set of tools and creative features. From photo editing and collages to drawing and digital art PicsArt provides a variety of options to enhance and transform your images. The app also offers a vibrant social media community for sharing and exploring creations.

Desygner

Desygner is a flexible Android graphic designing software that allows you to create designs for various purposes including social media marketing materials and presentations. With its extensive library of templates and customization options Desygner makes it easy to create visually appealing designs without prior design experience.

Conclusion

With the advancements in technology Android graphic designing software options have become more versatile and user-friendly than ever before. Whether you’re a professional designer or just exploring your creative side these top 10 Android graphic designing software options provide an array of tools and features to bring your ideas to life on the go. So grab your Android device and unleash your creativity anytime anywhere!
Categories
Cloudflare Security Websites

Advantages of using CloudFlare CDN on your website


In today’s digital world a website’s performance and security play crucial roles in delivering a positive user experience. To address these concerns the use of a Content Delivery Network (CDN) has become increasingly common among website owners. Among the most popular CDNs available Cloudflare has emerged as a powerful and reliable solution. In this article I am going to look at three key advantages of using Cloudflare CDN on your website: enhanced security improved speed and robust DNS management.

Enhanced Security

Cloudflare CDN offers invaluable security features that protect websites from various types of cyber threats. By utilizing Cloudflare’s extensive network infrastructure your website benefits from distributed denial-of-service (DDoS) attack mitigation preventing potential downtime and maintaining uninterrupted user access. Additionally Cloudflare’s Web Application Firewall (WAF) filters out malicious traffic ensuring that your website remains secure from common web vulnerabilities such as SQL injection and cross-site scripting. With Cloudflare’s SSL/TLS encryption all data transmitted between users and your website is secured further enhancing the overall protection of sensitive information.

Improved Speed

The speed at which your website loads is a critical factor in user satisfaction and engagement. Cloudflare CDN significantly enhances website performance by storing website caches in its globally distributed data centers. When a user requests access to your website Cloudflare serves the content from the nearest server reducing latency and improving page load times. Additionally Cloudflare’s advanced content optimization techniques such as automatic image compression and minification of HTML/CSS/JavaScript files further contribute to faster rendering and improved overall performance. These optimizations ultimately lead to higher conversion rates increased user retention and improved SEO rankings for your website.

DNS Management

Cloudflare’s CDN comes with comprehensive Domain Name System (DNS) management capabilities. By using Cloudflare as your DNS provider you benefit from a fast and reliable DNS infrastructure that utilizes anycast routing technology. This ensures that DNS queries are resolved from the nearest Cloudflare data center resulting in reduced lookup times and improved website access speed. Additionally Cloudflare’s DNS management dashboard allows you to easily configure various DNS settings such as managing DNS records setting up page rules and implementing advanced routing logic. The robustness and flexibility of Cloudflare’s DNS management enable website owners to efficiently handle complex routing configurations and implement reliable failover mechanisms.

Conclusion

Incorporating Cloudflare CDN into your website can offer a multitude of advantages including enhanced security improved speed and robust DNS management. With Cloudflare’s powerful suite of features your website is protected from cyber threats loads faster for users worldwide and benefits from a scalable and reliable DNS infrastructure. As a result you can provide a seamless and secure browsing experience for your users contributing to increased engagement improved customer satisfaction and ultimately the growth and success of your online presence.
Categories
Apps eCommerce Websites Zimbabwe

Zimbabwean Marketplace Series: Classifieds


We’re now at the quarter of our marketplace series and I’ve written about 4 marketplace websites so far. These are the following
Pindula
Ownai
Idhiri
Tengesai
Today we’re talking about Classifieds

Introduction

Classifieds have been around for a very long time now and they just might be the oldest marketplace we have in the country. The brand has been evolving till it reached the point it is now, the way their logo has been transforming till now says it all.

Content

Classifieds features a lot of amazing content found within different categories. From housing to groceries, they have it all. Their site is packed with content which makes it an ideal marketplace for you to shop.

Dating Platform

This is a classifieds exclusive. I mean we have seen others like Zimjolo try to do it but classifieds really did it, it’s impressive. The dating platform isn’t that famous, and I don’t think it will be because of how we do things here in Zimbabwe but a great thanks to classifieds for trying.

Speed

The site’s got some pretty decent speed for one of it’s size. Personally, I find no problem in the site’s loading speed and the elements load faster than other marketplace websites. Here’s the Google Pagespeed Insights test results:

Conclusion

This is one of the marketplace websites we must utilize completely as Zimbabweans. The site’s safe, fast and fully packed with products to buy from various sellers. One notable feature of the site is the 18+ Dating Platform which has just been introduced.
Categories
Android Apps eCommerce Websites

Zimbabwean Marketplace Series: Ownai

 Exactly 10 days after my last article, I return and we continue our marketplace website series, this being day 4. My apologies for being away for the past 10 days, I was working on my portfolio, tino.co.zw which I’m happy to announce that it’s finally online.

As I promised , day 4 will be about Ownai since I was supposed to write about it on day 3. 

Ownai

Ownai is a Cassava Smarttech startup that has almost everything a Zimbabwean would look for in a marketplace. Yeah I gotta break it to you, I’m impressed. Ownai comes with the normal marketplace look whilst including it’s own features. Let’s dig in deeper.

How you can find them

Ownai has a website, ownai.co.zw and mobile apps for both Android and iOS available on their respective stores.

The UI

Ownai comes with a great and usable UI which has a few notable flaws. Firstly the site takes a lot of time to load, displaying it’s preloader on all of the products on the home screen, which drives away potential impatient customers, which is bad. Even the Google Pagespeed Insights test proved this as the site only got a positive result on SEO, you can see for yourself.

Judging by the results, Ownai has a lot to improve. Upon my first trial to view the site, I came across the annoying preloaders but I had to wait for it to load, although it took a lot of time. For someone who’s used to Netone’s bad reception, I thought it was because of my network but after the Pagespeed Insights results, I became certain it wasn’t because of my network. Here’s the screenshot of the specific section.

Content

It’s perfect. That’s what I can say briefly as Ownai comes with perfectly categorized and grouped content. Which I really loved. Their menu has it all, under the correct categories. They even have a gaming category, where you’ll get some of the most popular PC games for sale. See, it’s perfect! 

Conclusion

Ownai has a lot of products available for sale from various sellers too. Their site is perfectly stocked and categorized. The only flaw with Ownai is the time it takes loading, but it’s not really long though. So if you’re looking for a marketplace to sell your products, or to buy something you’re looking for, Ownai is the perfect choice.

Categories
eCommerce Websites Zimbabwe

Zimbabwean Marketplace Series: Idhiri


Day 3 was initially supposed to be for Ownai but we’re now going to be talking about Cassava’s marketplace next time. A few minutes ago, I came across this marketplace which seems like it has been operating for a while now but I’d never heard of it. I present you Idhiri, a marketplace website I just discovered. When I discovered it, I just knew I had to write an article on it and here we are now. 

Idhiri

Idhiri seems like it hasn’t been operating for a long time judging by it’s level of popularity and also it’s content. The site just popped up on a google search and who am I to refuse to review something new to me. So I did. 

Design 

This is Idhiri’s most disappointing part, the design. The site’s good and decent to some extent but I just didn’t get those chills I get when I see good design. Starting from the status bar, they’re website has the 2017 experience on it. Especially on mobile. The design is far from modern if you ask me. Scrolling is also not smooth as it feels like it’s hindered by some kind of process which is still loading in the background. Overaly, the design is not bad, it’s just not as modern as I expected it to be. 

Content

As I mentioned earlier, Idhiri doesn’t have that much content as compared to it’s counterparts which might just be one of the reasons holding it down. The site consists of a limited range of products and a few or no services of certain services. This is not Idhiri’s fault though, it’s only influenced by the number of people who are on the site.

Google Pagespeed Insights

Here are the usual, the google pagespeed insights which are surprisingly higher than the othe sites.

Notable features

Not everyone has a bad side, even in terms of websites. Idhiri.com has one specific feature, which I haven’t seen till now. They have multiple types of listings and each listing has it’s corresponding upload steps. Let’s not forget the buy option, with which one can choose to post a listing regarding the item they’re looking for. You can see below:

Conclusion

Idhiri stands out from the crowd with the last mentioned feature. Also with their design which I had some issues with, I can’t say it’s bad though, I’d be lying to myself.